
If you are like most rock hounds you probably have piles of rocks in the back yard. You might have a butane soldering torch from the hardware store too. And that garage is filled with more tools than you can shake a stick at. Chances are you have almost everything you need to make some silver jewelry; all you need is the silver. In this article I will explain step by step how to make a silver ring with a turquoise cabochon using silver smithing tools, or items found in most well stocked garages. As you read you can develop a list of tools and supplies that you will need to get started. If you have already begun to make jewelry but are thinking of taking up silver smithing, hopefully this will help you take the next step.
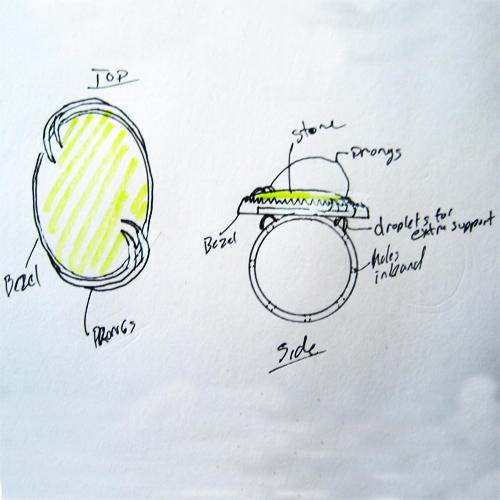
I like to sketch out the design first on paper so that I can see ahead of time how many pieces the ring will have and what kind of wires, sheets and other elements I will need. Above is my drawing of what I plan to make. This tutorial will guide you through step by set on how to make this ring. This ring has two basic parts; the ring, or band, and the setting. It does not matter which you make first, I usually like to start with the band. First I select a wire stock. Sterling silver comes in many shapes and gauges of wire. I want a thick and sturdy band so I select a hefty rectangular wire stock. The wire is bent around a metal ring mandrel by hammering the wire against the mandrel. You will need both hands so the mandrel is secured in a bench vise. I use a rawhide hammer because it is hard enough to bend the metal, but will not leave a mark. You can also wrap a piece of leather around a hammer or wooden mallet to get the same effect.
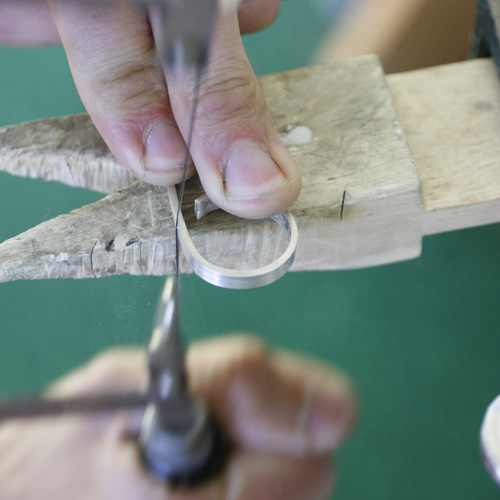
Once the ring is bent most of the way around, I saw through the wire, guessing where to cut based on the size I need to make the ring. This "guess" becomes more accurate with experience. A jewelers saw is useful here but a hack saw will also work. If you do decide to use a jewelers saw, be sure to use a vertical up and down motion, applying light pressure, any sideways torque will usually snap the saw blade. After cutting the wire, I file the ends smooth so that when I bend it into a circle the ends will meet up in a smooth joint. Many people will use a vise to hold the ring while filing and sanding, I prefer to just hold it in my fingers. If you are using a thicker wire, you may have to hammer the band in order to get the ends to meet. It is important that they are flush because the solder will not fill large gaps.
Before all soldering operations I apply a thin layer of flux to the entire piece making sure that the flux gets into the joint. The solder will not flow where the flux was not applied. It is also important that the pieces be clean from dirt, grim and grease. The ring is held in a pair of soldering tweezers and a small piece of hard solder (melts at a high temperature) is set on top of the joint in the ring. This is all arranged on top of a soldering board; an unglazed piece of ceramic tile will also work. For those that are thinking of using that lead pipe solder, think again! Silver solder is used in jewelry making and is available from most supply houses. I like to keep about six different temperature solders on hand, but three is enough for most projects. Start with the hard solder so that later when you use a medium solder, the hard solder will not melt.
I use an acetylene torch but I have used a MAPP Gas and a Butane torch before as well. The ring is heated evenly with a hand held torch. Be sure to move the flame across the piece to ensure even heating. The flame is hottest at the tip of the blue flame, so keep that part a good inch away from your work. The flux will bubble and then dissipate as you heat the silver, this may dislodge the piece of solder from its resting place. use a small soldering pick to move the solder back into place as you continue to heat the metal. This is just a piece of metal such as aluminum or titanium with an insulated handle. You will see the solder start to get glossy and a little runny as it gets hotter. Just before the solder melts the flame is brought to the opposite side of the joint so that the solder will flow into the joint, towards the flame. Solder will always follow the heat!
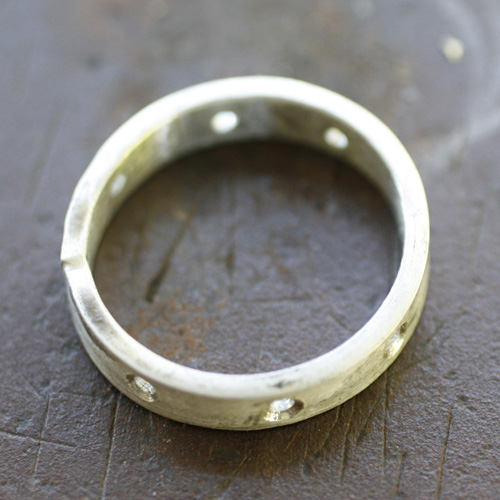
The ring is removed using a pair of copper tongs, careful not to touch the very hot tweezers...and dunked in a bath of mild acid which we metal smiths call "the pickle". This will clean off all of the extra flux and any other residue from the soldering operation. I use copper tongs because steel tongs will react with the acid in a minor explosion! Just kidding! It won't explode, but the steel and acid will react and end up copper plating the silver ring... odd and rather counter intuitive but that's chemistry for you! If you don't have the acid, a glass of water will work too, afterwards just scrub with soap and water to remove and residue. The ring is then slid back on the ring mandrel and hammered with the rawhide mallet. This will round out the ring into a near perfect circle. The edges of the solder joint are filed smooth. In this design, I am going to make 7 holes spaces evenly around the ring. I mark along the outside with a pencil where I want to place each hole. The ring is clamped down in a vise with two pieces of cardboard on either side to keep the vise from leaving a mark. I use a pointed metal stamp to make a small mark where each hole will be drilled. One of the few power tools I use, a hand held drill, is used to carefully drill each hole. The design calls for the outside of each hole to be beveled so I use a round metal bur in a Dremel tool to route out the top portion of each hole. this also helps the clean up the hole. The inside of the ring will still need to be sanded and smoothed. A laborious task involving sanding out the inside with sand paper. Starting with a fine file and moving through 220, 400, 60 and 1000 grit sand paper is usually the best for achieving a good shine on the silver. Wet/Dry sand paper used for automotive work is usually much better than wood working sand paper.
Wait... where is the rest of the article!?! Don't worry! It is here. This link will take you to the full article on my webpage which also includes 50 full color pictures along each step.
No comments:
Post a Comment